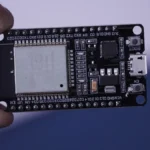
The ESP8266 Espressif Systems IC RF TXRX MCU WIFI 32QFN, developed by Espressif Systems, has revolutionized IoT and smart home applications. This affordable and versatile module features built-in Wi-Fi, enabling seamless communication between devices, making it ideal for wireless projects. Its compact design and reliable performance have made it a favorite among developers. Modules like ESP-01 and NodeMCU simplify its integration into various projects. Priced between $3 and $6, it is accessible to both hobbyists and professionals. With the growing demand for IoT solutions, the ESP8266, alongside the keepbooming:ESP32 Espressif Systems series Distri, continues to enhance smart homes, agriculture, and industrial automation.
Key Takeaways
-
The ESP8266 is a low-cost Wi-Fi module, great for smart homes and IoT. It costs $3 to $6.
-
With the ESP8266, users can control devices from anywhere. It connects fast and shows device status instantly.
-
The ESP8266 works with sensors to check the environment. This makes it useful for homes and factories to collect data.
-
Setting up the ESP8266 for home use is easy. You need simple parts like the Wemos D1 Mini and a DHT22 sensor.
-
Farmers can use the ESP8266 to automate farming. It helps them water crops better and save resources.
Key Uses of ESP8266 in IoT and Smart Homes
Controlling Devices from Anywhere
The ESP8266 helps control home devices from far away. Its built-in Wi-Fi lets users manage lights, fans, or plugs using phones or websites. For example, a smart plug with ESP8266 shows how reliable it is for remote control. This setup is cheaper than buying ready-made smart devices.
These systems have useful features like quick connections, device status checks, and power tracking. It connects in 1-2 seconds and always knows if it’s ON or OFF. It also tracks electricity use and has timers to schedule tasks. These make the ESP8266 a great pick for smart home projects.
|
Feature |
What It Does |
|---|---|
|
Quick Connection |
Connects and works in 1-2 seconds after turning on. |
|
Status Check |
Always knows if the device is ON or OFF. |
|
Power Tracking |
Tracks electricity use and sends alerts if needed. |
|
Saves Device State |
Remembers device settings for long-term use. |
|
Programmable Timer |
Sets exact ON/OFF times, syncing with internet time. |
Checking Environment and Collecting Data
The ESP8266 is great for checking the environment and sharing data. It works with sensors to measure things like temperature, humidity, and air quality. This data can go to cloud platforms like Amazon AWS IoT Core for live updates. Its low price and good performance make it perfect for smart homes and factories.
|
Feature |
What It Does |
|---|---|
|
Works Well |
Collects and shares data quickly and easily. |
|
Affordable |
Costs less, so more people can use it. |
|
Easy to Use |
Fits into IoT systems without trouble. |
|
Internet Connection |
Sends data live using Wi-Fi. |
|
Sensor Friendly |
Works with many sensors for environment checks. |
Works with Smart Home Systems
The ESP8266 works well with smart home systems like Amazon AWS IoT Core. It lets users control devices with voice or apps. For example, it can adjust smart lights to change brightness or color. Its ability to work with many systems makes it key for smart homes.
Using the ESP8266, developers can build smart home systems that are easy to grow. Its compatibility ensures devices work well together, making life easier for users.
Industrial IoT applications for automation and monitoring
The ESP8266 helps industries monitor and control processes in real time. Its built-in Wi-Fi works with many sensors, making it great for factories. Using the ESP8266, industries can save money, improve safety, and work more efficiently.
Factories often use the ESP8266 to check temperature, humidity, or fire risks. It gathers sensor data and sends it to a web dashboard. This dashboard shows live data, helping users spot problems quickly. For example, it can track machine heat to stop overheating and keep things running smoothly.
Tip: Predictive tools with the ESP8266 study past data to find problems early.
The ESP8266 connects to many sensors for detailed monitoring. This is important for industries with strict rules. For instance, food plants can use it to check humidity and meet safety standards. Fast and accurate data sharing makes work safer and more efficient.
Benefits of using the ESP8266 in factories include:
-
Watching important data live.
-
Making better choices with clear data visuals.
-
Safer work with reliable sensor readings.
-
Affordable setup for factory automation.
The ESP8266 is flexible and low-cost, making it popular for IoT projects. It helps factories follow rules and improve how they work every day.
Setting Up the ESP8266 for a Home Automation System
Required hardware components and tools
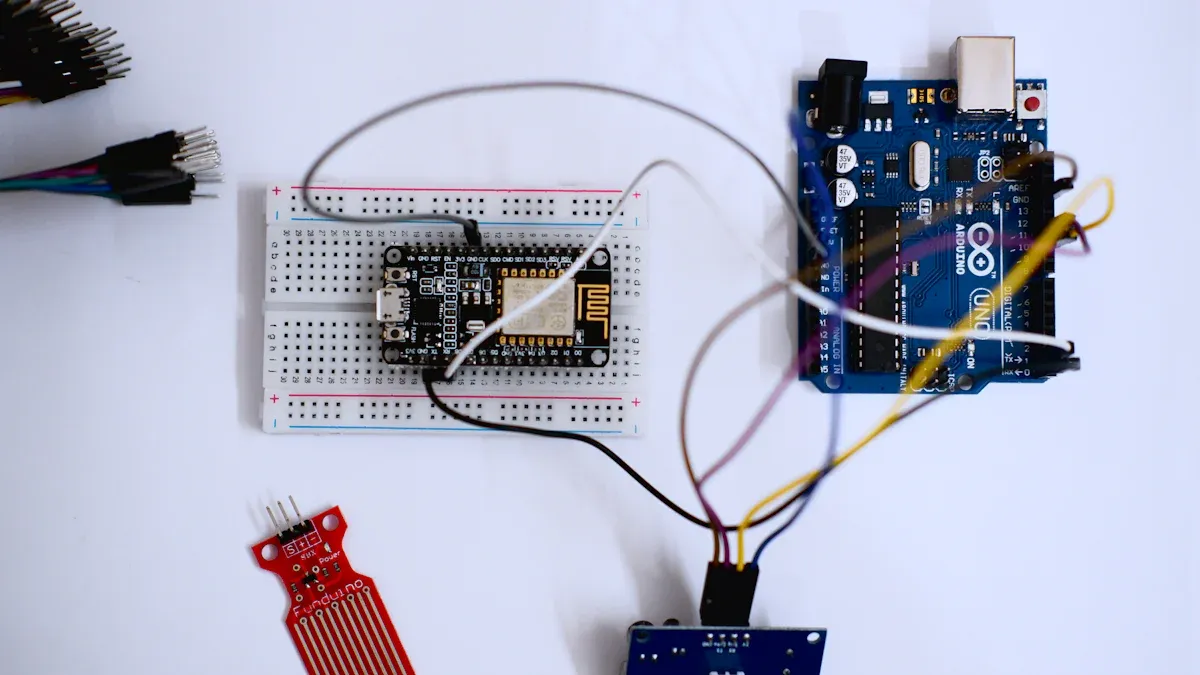
To make a home automation system with the ESP8266, you need some tools and parts. The Wemos D1 Mini is a small microcontroller that is the main part of the system. It has Wi-Fi, a CPU, memory, and several pins for connections. A DHT22 sensor checks temperature and humidity. A 5V power supply keeps everything running smoothly. For wireless setups, you can add a Battery Shield. Mini breadboards and jumper wires make testing easier. Software like Homie for ESP8266 and the DHT library help connect sensors easily.
|
Component |
What It Does |
|---|---|
|
Microcontroller |
Wemos D1 Mini (ESP-8266 based) – small, has Wi-Fi, CPU, memory, and pins. |
|
Sensors |
DHT22 sensor measures temperature and humidity. |
|
Power Supply |
Needs 5V, or use a Battery Shield for wireless setups. |
|
Prototyping Tools |
Mini breadboards and jumper wires for easy testing. |
|
Software Libraries |
Homie for ESP-8266 and DHT library for sensor connections. |
Step-by-step guide to hardware setup
Setting up the ESP8266 for home automation is simple if you follow steps. Start by plugging the Wemos D1 Mini into your computer using a USB cable. Install drivers so the computer can talk to the microcontroller. Use a mini breadboard to connect the DHT22 sensor to the Wemos D1 Mini. Add a 5V power supply or Battery Shield for wireless use. Check all the connections before moving to the programming step.
-
Plug the Wemos D1 Mini into your computer with a USB cable.
-
Install the drivers for proper communication.
-
Connect the DHT22 sensor using a breadboard.
-
Add a 5V power supply or Battery Shield.
-
Check all connections carefully.
Circuit diagrams and wiring instructions
A circuit diagram helps you connect everything correctly for home automation. The DHT22 sensor connects to the Wemos D1 Mini using a digital pin. The power supply gives 5V to the microcontroller and sensor. Jumper wires link all parts together securely. The ESP8266 works as a server, letting you control devices through a web browser. This setup shows how the ESP8266 can make smart home devices work together.
Tip: Use jumper wires with different colors to avoid mistakes while wiring.
Programming the ESP8266 for IoT Projects
Installing and setting up the Arduino IDE
The Arduino IDE is easy to use for programming the ESP8266. First, download it from the official website. After installing, open the IDE and go to File > Preferences. In the “Additional Board Manager URLs” box, add this link: http://arduino.esp8266.com/stable/package_esp8266com_index.json. This helps the IDE recognize the ESP8266 board.
Next, click Tools > Board > Boards Manager. Search for “esp8266” and install the package. After that, choose your board, like NodeMCU, from Tools > Board. Make sure the correct COM port is selected under Tools > Port. Now, the IDE is ready to program the ESP8266 module.
Writing and uploading programs to the ESP8266
You can write programs for the ESP8266 using the Arduino language. Open a new sketch in the IDE. For example, to make an LED blink, use this code:
void setup() {
  pinMode(2, OUTPUT); // Set GPIO2 as output
}

void loop() {
  digitalWrite(2, HIGH); // Turn LED on
  delay(1000);           // Wait 1 second
  digitalWrite(2, LOW);  // Turn LED off
  delay(1000);           // Wait 1 second
}
Connect the ESP8266 to your computer with a USB cable. Click the upload button to send the code. The LED on the ESP8266 will blink, showing the program works. This shows how the ESP8266 can be used for smart home tasks.
Setting up Wi-Fi and MQTT for IoT
To use IoT features, connect the ESP8266 to Wi-Fi and set up MQTT. Start by adding libraries like ESP8266WiFi.h and PubSubClient.h to your code. Use this example to connect to Wi-Fi:
#include <ESP8266WiFi.h>
const char* ssid = "Your_SSID";
const char* password = "Your_PASSWORD";

void setup() {
  WiFi.begin(ssid, password);
  while (WiFi.status() != WL_CONNECTED) {
    delay(1000);
  }
}
For MQTT, set up the ESP8266 to send and receive messages on platforms like Amazon AWS IoT Core. Use the PubSubClient library to connect and share data. This makes it easy for devices to talk to each other, perfect for smart homes and factories.
Tip: Amazon AWS IoT Core offers reliable MQTT services for IoT projects.
Real-World Use Cases of ESP8266 in IoT
Making a web server to control devices
The ESP8266 WiFi module helps create a local web server. This server lets users control devices from anywhere. Developers can use it to build home automation systems. These systems allow users to manage fans, lights, and plugs easily. Hosting the server locally makes it faster and less dependent on outside networks.
For example, a NodeMCU board can be the system’s main part. It connects to home Wi-Fi and shows a webpage on any device. Users can turn switches on or off through this page. The local server also saves energy by scheduling tasks based on user needs. This setup makes smart homes more convenient and energy-efficient.
Smart lights and saving energy
The ESP8266 is important for smart lighting systems. It works with sensors and platforms like Amazon AWS IoT Core. These systems adjust lights based on time or room use. Smart lighting makes homes comfortable and saves energy.
For instance, the ESP8266 can connect to motion sensors. Lights turn on when someone enters a room. They dim or turn off when the room is empty. By saving energy, the ESP8266 helps lower electricity bills and supports eco-friendly living.
Factory monitoring and fixing problems early
The ESP8266 is great for factory automation. It helps monitor machines and predict problems early. The module works with Amazon AWS IoT Core to collect sensor data. This data improves processes and prevents machine failures.
Key benefits include:
-
Real-time Monitoring and Control: Watches factory processes for quick actions.
-
Predictive Maintenance: Spots problems early to avoid delays.
-
Resource Management: Tracks usage to improve efficiency.
For example, factories use the ESP8266 to check temperature and humidity. It sends data to a local server for quick fixes. Predictive tools study past data to plan maintenance. This reduces sudden breakdowns, improves safety, and cuts costs. The ESP8266 makes factory work smoother and safer.
Automating irrigation systems for agriculture
The ESP8266 helps make farming easier by automating watering systems. It connects to Wi-Fi and works with sensors to check soil and control water flow. This helps farmers save water, avoid waste, and grow better crops.
An automated system with the ESP8266 uses soil sensors, pumps, and a controller. The sensor checks how wet the soil is. If the soil gets too dry, the ESP8266 turns on the pump to water the field. When the soil is wet enough, the pump stops. This system manages water well without needing people to do it.
Tip: Farmers can use cloud tools like Amazon AWS IoT Core to control and watch their systems from far away.
The ESP8266 also has smart features like timers and predictions. Farmers can set it to water plants at certain times. It can also study past data to guess when watering is needed. These tools are helpful in areas where water is scarce.
|
Component |
What It Does |
|---|---|
|
Soil Sensor |
Checks soil wetness and sends info to the ESP8266. |
|
ESP8266 Module |
Reads sensor data and controls the pump. |
|
Water Pump |
Waters the field when the ESP8266 tells it to. |
Using the ESP8266 in farming saves money, water, and time. It keeps crops healthy and reduces work for farmers. This technology is affordable and works for both small and big farms. It helps farmers grow food in a smarter and more sustainable way.
The ESP8266 is a great tool for making smart home and IoT projects. It is cheap, easy to use, and works with many platforms. Both beginners and experts can use it to control devices or automate tasks at home. The ESP8266 opens up many creative possibilities.
Try using the ESP8266 to make your own projects. This small module can help create smart solutions for homes, farms, and factories. If you need help, check out these useful resources with guides and ideas:
-
Getting Started with ESP8266 NodeMCU Development Board: A beginner-friendly guide.
-
Home Automation with the ESP8266: An eBook for learning automation.
-
Free ESP8266 Projects and Tutorials: Tutorials for different ESP8266 uses.
-
200+ ESP8266 NodeMCU Projects, Tutorials and Guides: Over 200 projects with steps.
The ESP8266 inspires developers to turn their smart home and IoT ideas into reality.
What is the ESP8266, and why is it good for IoT projects?
The ESP8266 is a cheap Wi-Fi microcontroller. It is popular because it is affordable, has built-in Wi-Fi, and works with many platforms. People use it to make smart home and IoT projects because it is easy to use and works well.
Can beginners work with the ESP8266?
Yes, beginners can use the ESP8266. It works with tools like Arduino IDE, which makes programming simple. There are many guides and tutorials online to help new users start making IoT and smart home projects.
What programming languages can you use with the ESP8266?
You can program the ESP8266 using C or C++ in Arduino IDE. It also supports MicroPython and Lua for scripting. These choices let users pick what works best for their projects.
How does the ESP8266 go online?
The ESP8266 connects to the internet using its built-in Wi-Fi. You can set it up by adding your Wi-Fi name (SSID) and password in the code. Once connected, it can send and receive data online.
What sensors work with the ESP8266?
The ESP8266 works with many sensors like DHT22 (for temperature and humidity), MQ-2 (for gas), and soil moisture sensors. These sensors collect data, making the ESP8266 great for smart homes, farming, and factories.
Tip: Always check if the sensor works with the ESP8266’s 3.3V power level.
See Also
Step-by-Step Guide to Smart Home Automation with STM32F030C8T6
AD9736BBCZ: Revolutionizing the Future of Wireless Communication
Empowering Robotics with AI Edge Computing via RV1126
Three Innovative Methods ATIC83E2 Enhances Industrial Automation
Powering Industrial Automation Solutions with ARTESYN NPT42-M